Awarded as the winner of the Malaysia Ministry of Tourism’s Malaysia International Fabulous Food 1Malaysia Blog Award 2013, Tony from Johor Kaki is a very talented food blogger. He lives in Singapore but travels to Malaysia almost every other day to explore and share the good food in Johor. Derrick and I have been talking about planning a Malaysian Food Trail since last year and we finally did it last Monday, all thanks to Tony for bringing us around Johor! We conquered more than 10 dishes for breakfast, lunch and dinner!
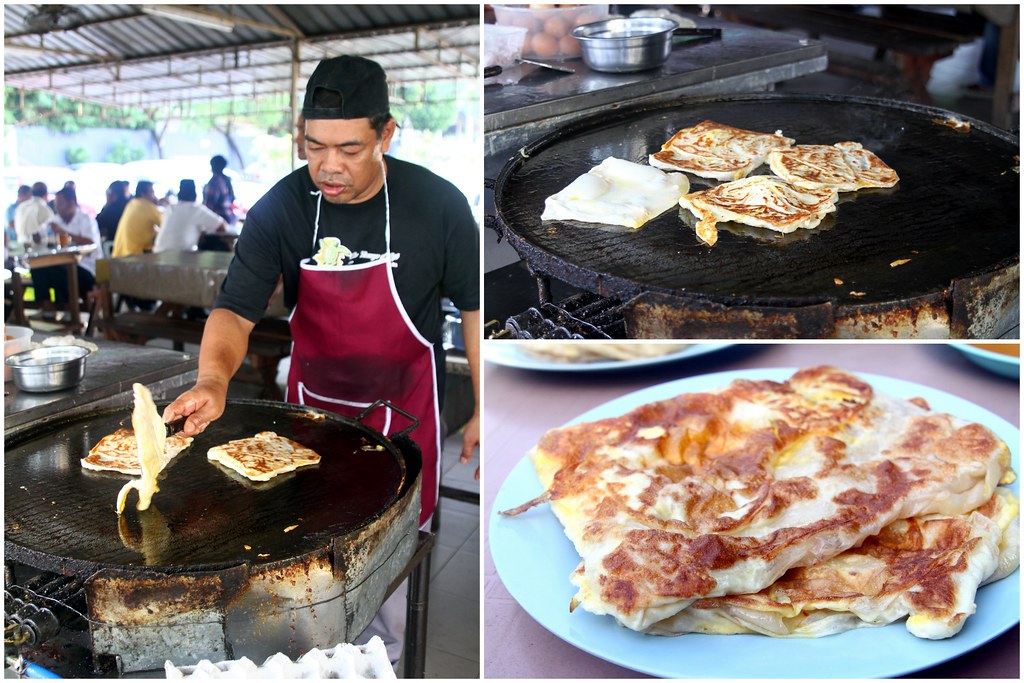
1. Roti Canai Bukit Chagar
![Malaysia]()
Our breakfast was at Bukit Chagar Roti Canai. I like their prata because it is thick, crispy outside, softer inside, and not-too-oily. The prata goes very well with their dhal which is mild and not too spicy. For those who like it hot, you can add a dab of sambal chili for that extra oomph. Tony expected us to only share two pratas as it will be a long day of makan, but in the end we ordered 5! LOL! And guess what, the total bill is only RM$7.80!
Roti Canai Bukit Chagar
Address: Junction of Jalan Bukit Chagar and Jalan Ungku Aziz (next to Pine View Apartments and PDRM Apartments, map here)
Opening Hours: 6:00am to 11:00am (breakfast only, roti canai often sold out by 10:00am)
Halal
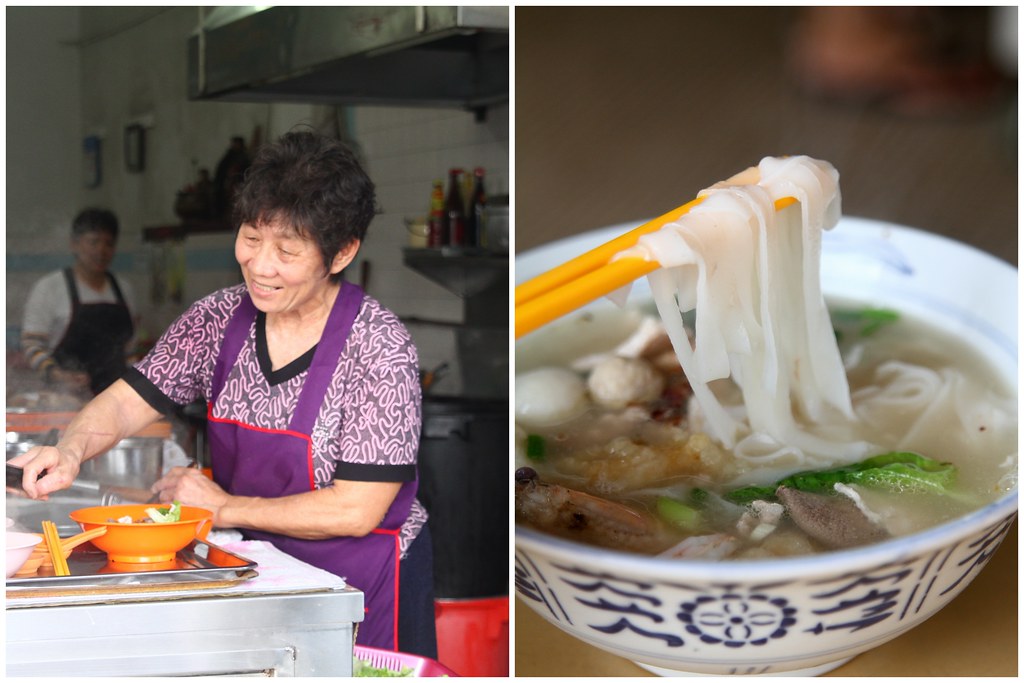
2. Restoran Tua Thow
![Malaysia-001]()
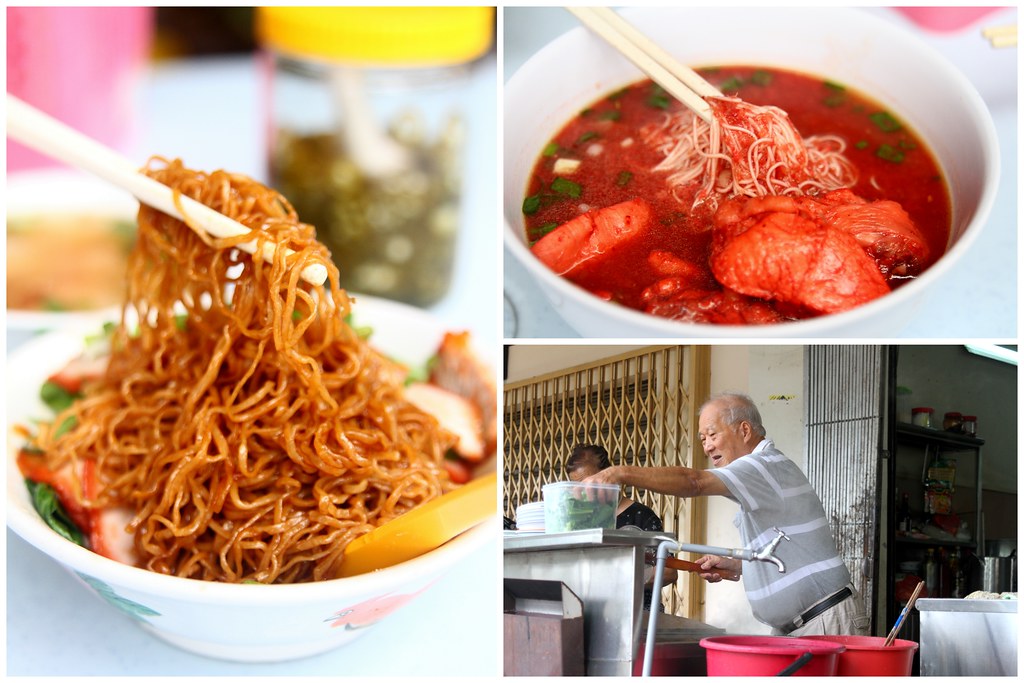
We were supposed to head to Taman Tasek Kway Teow Kia but unfortunately, it was closed. We drove past Restoran Tua Thow and Tony said this is one of the best Kway Teow Soup for him, so we decided to try it. For a RM$10 bowl of kway teow soup, it had many many ingredients in it, including prawns, sea bass, pork, fish ball, fish maw etc. The spork and fish bone based soup was clear and naturally sweet. It does not have any MSG.
Restoran Tua Thow (Kway teow soup stall)
Address: Susur 4, Jalan Tun Abdul Razak (next to Shell petrol station, map here)
Opening Hours: Daily 7:30am to 2:30pm (closed on Fridays)
Non Halal
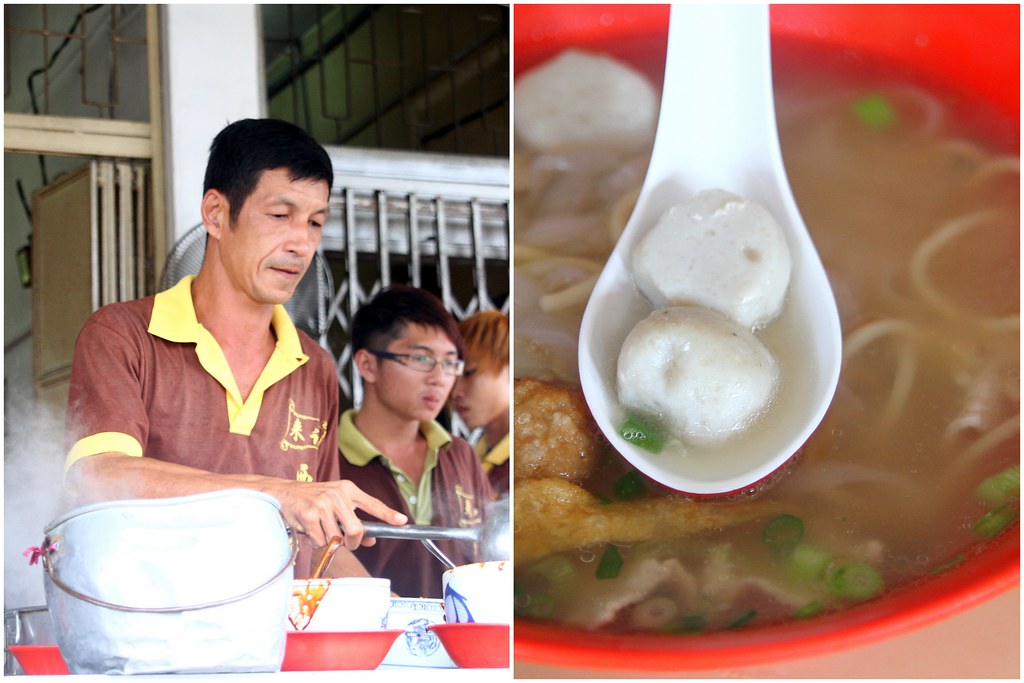
3. Restoran Lai Kee
![Malaysia-003]()
47-year-old boss, Ah Lai (亚来) started this business when he was 22 years old and his fishballs are made purely from ikan parang (Xi Dao). Ah Lai’s fish balls are freshly hand made every day at the shop. No MSG, no preservatives, each fishball is very springy. Everyday, they use 60kg of fish meat to make the fishballs. Their fishballs are so good that it attracted many tourists on Sundays, and you have to wait for at least 30mins. They also make their own fishcakes, and it is very Q. Be sure to try their dry version because the chilli takes 6 hrs to fry to give out the fragrance. Each bowl of noodles costs RM$4.50.
Restoran Lai Kee 来记西刀鱼丸
Address: 90, Jalan Pahlawan 2, Taman Ungku Tun Aminah (TUTA), Skudai, 81300 Johor Baru (map here)
Opening Hours: Daily 7:00am to 4:30pm
Non Halal
4. Restoran Wah Cai
![Malaysia-002]()
Also a supplier to our local Jurong Point’s Malaysian Boleh, Restoran Wah Cai is famous for its 3-in-1 Fried Nian Gao (RM$1.50). Everything here is homemade, especially the nian gao which contains no egg at all, sandwiched between yam and sweet potatoes. The fried nian gao undergoes two deep frying, one is to make sure it is fried till cooked while the second deep fry is to ensure it is crispy. Another of their specialty, is the fried durian (RM$2.50) which is made with premium durian pulps. Once you bit it, the strong durian aroma lingers in the mouth.
Restoran Wah Cai
Address: 86, Jalan Pahlawan 2, Taman Ungku Tun Aminah (TUTA), Skudai, 81300 Johor Baru (map here)
Opening Hours: Daily 7:00am to 4:30pm
Not Certified Halal
5. Restoran Lima Ratus
![Malaysia-004]()
Restoran Lima Ratus is a humble shop in Taman Perling run by Mr Low and his wife with an elderly helper. 75-year-old Mr Low had been a noodle seller since the Japanese Occupation in the 1930s, when he was in his early teens. Being a Fuzhou man, the one and only dish he learnt from his mother was the classic Foochow red rice wine mee suah and it has brought many praises to the foodies at the table. The mee suah was silky smooth, with tangy and sweet homemade red rice wine broth. Beside this, the stall is also famous for its wanton noodles. Their make their own noodles with duck egg, which we hardly see it nowadays! The wanton noodles are on the dry side, but it tastes good with some stirring. FYI, Mr Low has a hidden talent for mimicking bird songs!
Restoran Lima Ratus
Address: 4, Jalan Undan 18, Taman Perling, Johor Bahru (map here)
Opening Hours: 7:00am to 3:00pm (Closed on Weds)
Non Halal
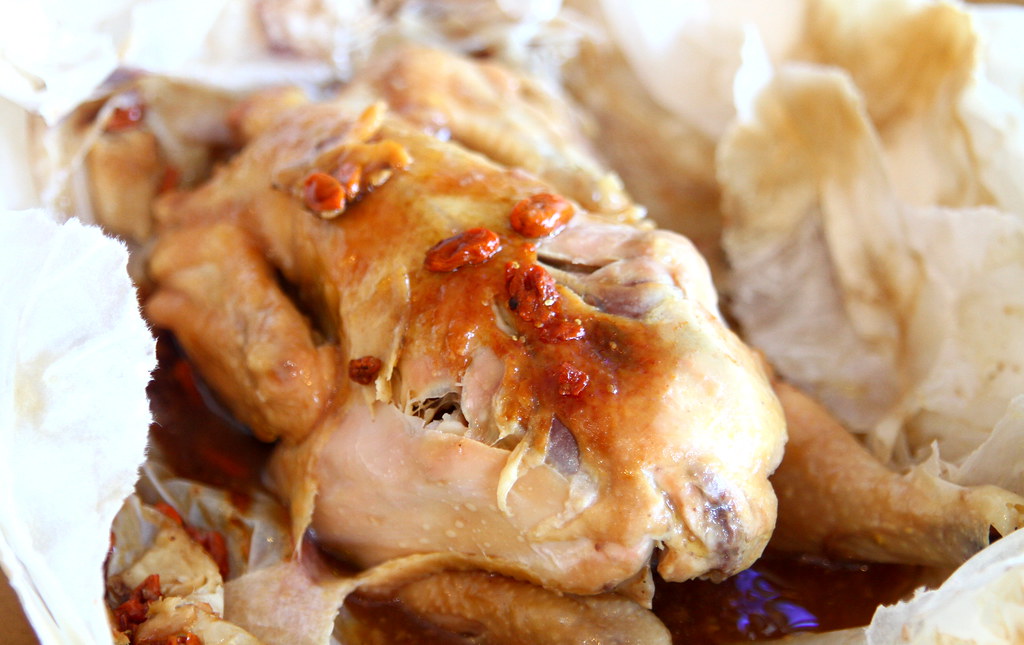
6. Restaurant Teck Sing
![IMG_7777]()
After eating so much food, we were too full and decided to take a walk around (AEON) JUSCO Tebrau City Mall before trying the paper wrapped herbal chicken in Restaurant Teck Sing. Wrapped with many layers of parchment paper, when we slowly tore open the paper, it has a nice herbal aroma that we could not resist. The kampong chicken meat is very soft and tender and it can be removed from the bones easily. Each herbal chicken costs RM$18.
Restaurant Teck Sing 德星
Address: 3 & 5, Jalan Sutera Satu, Taman Sentosa, Johor Bahru (map here)
Opening Hours: 11:00am to 10:00pm daily
Non Halal
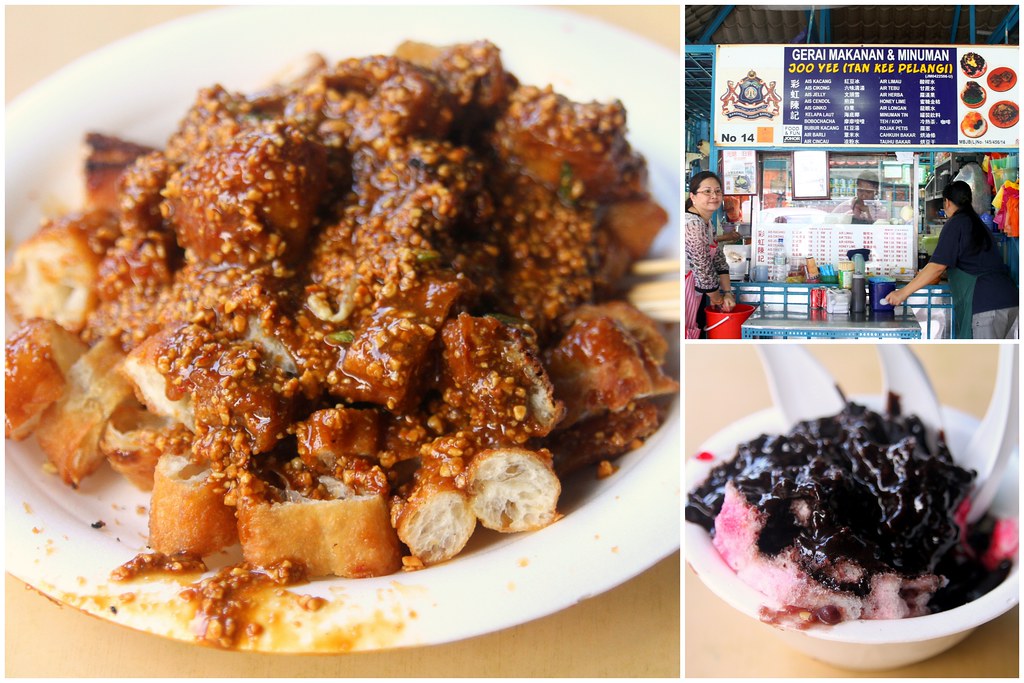
7. Joo Yee (Tan Kee Pelangi)
![Malaysia-006]()
Tan Kee Ice Kacang (Ais Kacang in Malay, or short form ABC) is a favourite among students because it is near Chinese High School. The red beans, corn, and attap seed were buried in a mountain of crushed ice, while the hawker pours generous amount of chocolate sauce on the ice. They made their own chocolate sauce from cocoa powder and you can ask for unlimited supply. They also sell yummy rojak which only has crispy youtiao and taupok. Total bill RM$9.
Joo Yee (Tan Kee Pelangi)
Address: Jalan Biru (stall in hawker centre opposite San Low seafood restaurant), Taman Serene, Johor Bahru (map here)
Opening Hours: Daily 7:00am to 5:00pm
Not certified Halal no pork, no lard served
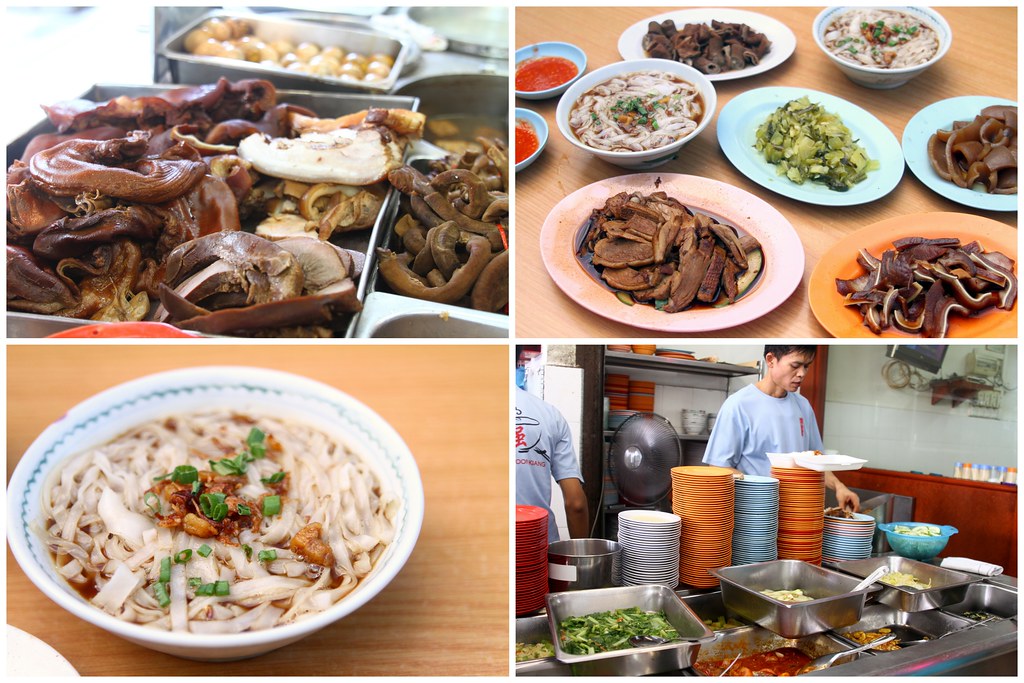
8. Restoran Woon Kiang
![Malaysia-007]()
Kway teow kia is only of the signature hawker food in Johor and it is definitely a pity if we miss it. Hence, Tony brought as to Woon Kiang for dinner. Kway teow kia is just like Singapore version of Kway Chap. The pork innards here are naturally sweet and tender, with subtle herbal sauce. The duck is very tender and the garlic chilli sauce has a spicy kick.
Restoran Woon Kiang
Address: #G-06, Jalan Pandan 1, Pangsarpuri Impian, Stulang, Johor Bahru (map here)
Opening Hours: 6:00pm to midnight (closed on Tuesdays)
Non Halal
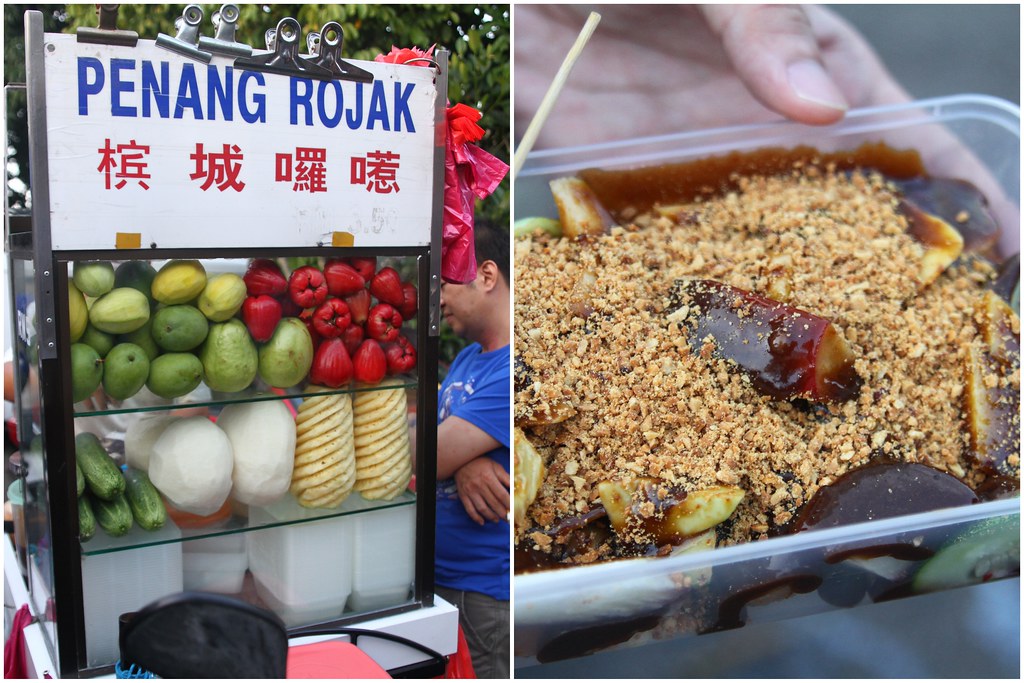
9. Mobile Penang Rojak Stall
![Malaysia-012]()
We went to a mobile Pasar malam at Taman Century (only here on Mondays) to burn some calories and eat more food. One of it is the Penang rojak, which is usually along Jalan Maju next to Pelangi shopping centre. The rojak man comes from Penang and the fruits are specially picked by the rojak man every morning to ensure that they are all fresh, juicy, and crunchy. This sauce is very unique, it is very thick which subtle sweet and savoury flavour. Very shiok.
Mobile Penang rojak stall (on motorbike)
Address: Along Jalan Maju next to Pelangi shopping centre in Taman Maju Jaya (map here)
Opening Hours: Mobile – only hours of the Pelangi location given here. Mon and Tues – 12:30pm to 3:45pm; Weds to Sun – 12:30pm to 5:00pm. Off on Thurs
No pork, no lard
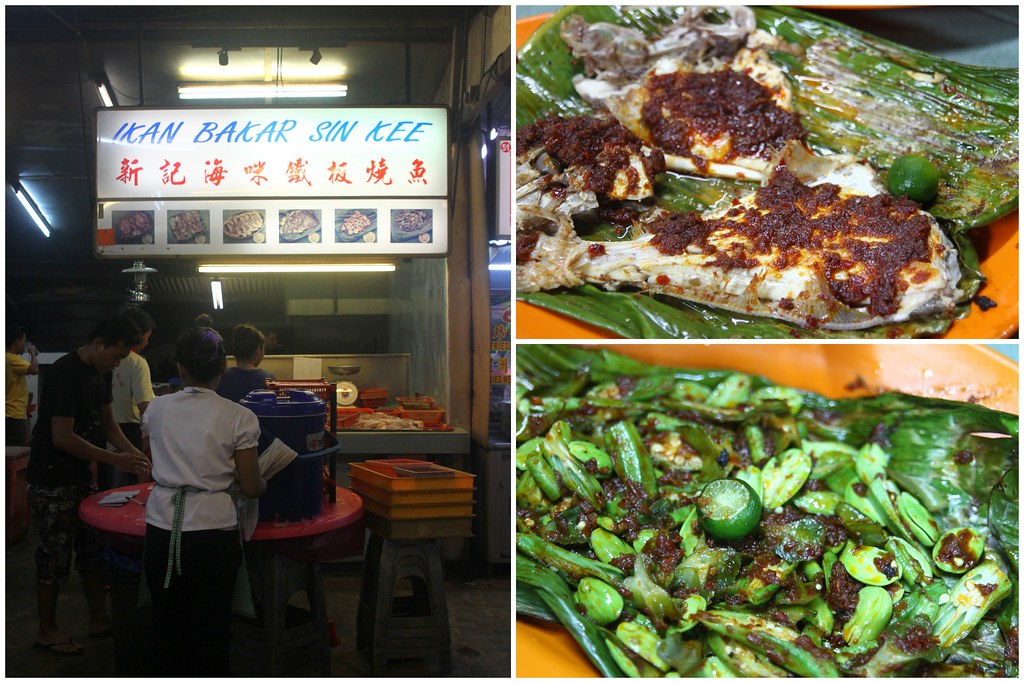
10. Sin Kee Ikan Bakar
![Malaysia-014]()
Our last stop for the day was at Sin Kee Ikan Bakar because their grilled seafood is really tasty. The sambal is not too spicy but savoury. We also had a plate of petai (irresistible stinky beans) and lady fingers which was crunchy.
Sin Kee Ikan Bakar @ Cedar Point Food Centre
Address: Jalan Musang Bulan 2-16, Taman Century, 80250 Johor Bahru (map here)
Opening Hours: Daily 6:00pm to midnight
Non Halal
____________________________________________________________________________________________________________________________________
I hope you enjoy reading this post as much as I enjoy eating all these food. Eating so many dishes in a day is seriously not easy but I am glad that we did it (although I have to do lots of exercise for the next few days). If you have tried some of the dishes above, drop me a comment and tell me if you like it! Alternatively, if you are thinking of driving to Johor for makan, hope this food trail gives you some good recommendations to go. I will blog about specific stalls and the pasar malam soon. Meanwhile, happy Monday and have a tamchiak week!